Hapi
Hapi (short for Hierarchical Access Policy Implementation), is a specification language that lets users define access policies. In a distributed system, an access policy defines the actions that each actor can perform on the available resources. Such policies are important because they ensure the preservation of the integrity and the privacy of personal information that users might store into remotely accessed databases. As an example, the specification below indicates that Bob can read all resources, Interns can read emails and credit card numbers, but Alice, who is an intern cannot read emails:
main =
  DENY
  EXCEPT {
    ALLOW {
      Actor: Bob
      Actions: Reads
      Resources
    }
    ALLOW {
      Actor: Intern
      Actions: Reads
      Resources: EMAIL, CCN
    }
    EXCEPT {
      DENY {
        Actor: Alice
        Actions: Reads
        Resources: EMAIL
      }
    }
  };
Hapi is strongly based on Sen et al.'s Legalease. Legalease is a domain specific language that supports the specification of hierarchies of access policies. Actors might have their rights either increased or decreased as we move down this hierarchy. Syntactically, the position of actors within this hierarchy is given by indentation; which like in Python, has semantic meaning in Hapi. Access hierarchies determine partial orders between actors and groups of resources. Thus, partial ordering emerges as a powerful metaphor to specify the access rights of groups and subgroups of users.
Hapi extends Legalease in several different ways. Most importantly, the original specification of Legalease was not sufficiently explicit about the language's grammar and usability. Hapi fills a number of omissions along these directions. In this book, we provide the full grammar specification of Hapi, as well as a description of its semantics. Additionally, we include an assortment of examples that will let users better comprehend how policies can be specified and enforced. Hapi also extends Legalease with a number of practical functionalities, namely, the ability to compose policies in multiple files, and a more concise syntax to specify conjunctions of access rights.
The Project Hapi is sponsored by Cyral Inc and developed at UFMG's Compilers Lab, which exists as part of the Department of Computer Science. This project is fully open source, and the interested users can find all our code base in publicly available repositories.
![]()
What are our goals?
The main goal of Hapi is to be an easy-to-use policy specification language, that offers users a simple and clear syntax to define the possible interactions between actors, actions and resources. Currently, access policies are programmed in data interchange formats such as JSON, YAML or XML. Such formats are employed in systems of vast importance, such as Amazon's AWS CloudFormation, Microsoft's Azure and Google's Firebase. Yet, it is our understanding that such formats, not having been conceived for this particular domain, could be replaced with more expressive specification languages, and this is precisely where Hapi comes in.
Technologies
Hapi is currently implemented as a combination of several different technologies. Parsing and translation is implemented in Kotlin, in conjunction with the parser generator ANTLR. Hapi programs are translated to YAML specifications by the Translator, which can be conveniently read and processed by different cloud computing systems.
Docker, together with Gradle and Visualizer, make it easy for the user to quickly get their first Hapi project up and running.
For more information, see Tooling.
Language
This section contains a definition of Hapi. This presentation is organized in three parts: syntactic specification, semantic specification and examples. Hapi is not Turing Complete; hence, it is not meant to describe general computations. Instead, Hapi is a declarative formal language that lets users specify access policies.
A program (or an access specification, as programs are called) determines what are the actions that each user can perform on each resource. A program is composed of three native data types: actors, actions and resources, which are defined via a special structure called concept lattice. Access specifications are organized hierarchically: lower level specifications might either increase or reduce the accesses of upper levels.
The Concept Lattice
A Hapi specification manipulates data types created by the user. These types are organized in a data-structure called concept lattice. A concept lattice is a lattice, that is, an abstract data structure formed by a set, plus a partial order between the elements of the sets. We define a partial order as follows:
- Given a set S, a partial order is a reflexive, transitive and antisymmetric relation that exists between some pairs of S.
Lattices have the following key property: every pair of elements has a minimum upper bound, and a maximum lower bound within the lattice. In other words, given two elements in the lattice, E1 and E2, the lattice must contain an element E' that is greater than both, and an element E" that is smaller than both. Any other element greater than both is also greater than E', and similarly, any other element smaller than both is also smaller than E". This property makes it easy to visualize lattices as graphs. Below we show three lattices that we use to define data types:
Lattices are fundamental to Hapi because they support the representation of orderings between the values of each attribute that is used in a program. If an attribute A1 is less than another attribute A2, then A1 either expands or constrains the access requirements of A2.
Concept Lattice
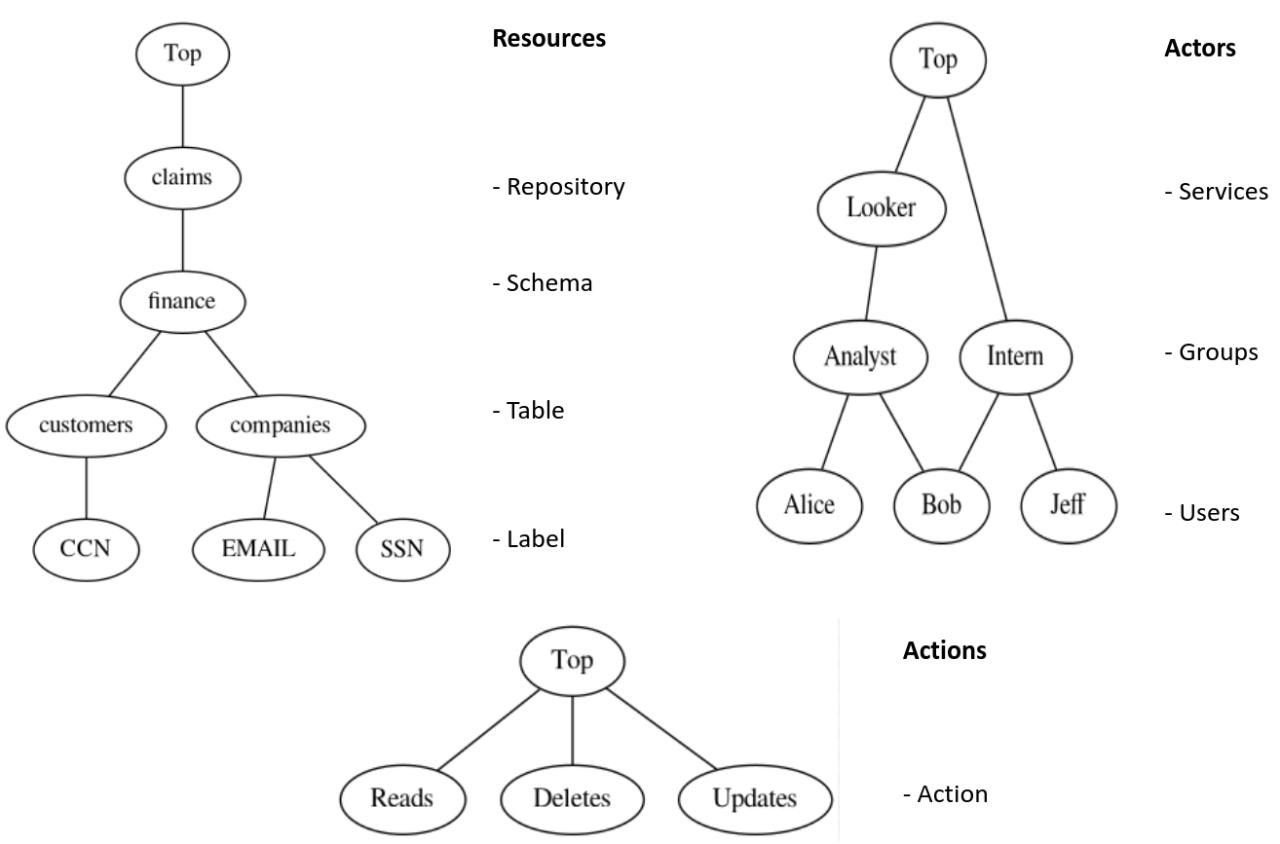
In Hapi, users specify lattices using the notion of a Concept Lattice. A concept lattice lets users specify all the data types that can be mentioned in a policy specification. A concept lattice consists of data specifications. Below you can see an example of a concept lattice describing the following entities:
- Actors: entities, like users or groups of users, who can perform actions on resources.
- Actions: the different ways in which actors can actuate on resources.
- Resources: the data that can be accessed by different actors via actions.
data Actors =
  Looker(Analyst),
  Analyst(Alice, Bob),
  Intern(Bob, Jeff),
  Alice, Bob, Jeff;

data Actions = Reads, Deletes, Updates;

data Resources =
  Claims(Finance),
  Finance(Customers, Companies),
  Customers(CCN), Companies(EMAIL, SSN),
  CCN, EMAIL, SSN;
This example specifies groups of Actors, Actions and Resources. The syntax X(Y, Z) denotes ordering, meaning that Y < X and Z < X. Therefore, in this example, we have that Analyst < Looker, meaning that Analyst and Looker are both Actors, although Analyst is a subgroup within the group of Lookers. For those coming from an object oriented background, you can think of Analyst as a subclass of Looker. The grammar used to specify concept lattices is given below:
dataStmt: 'data' ID '=' elem (',' elem)* ;

elem: ID ('(' value (',' value)* ')')? ;

value: ID;
Grammar
The specification below is Hapi's full grammar defined in ANTLR's notation:
grammar Hapi;

program
  : library
  | executable
  ;

library: exportStmt (stmt ';')+ ;

executable: (stmt ';')+ ;

stmt
  : letStmt
  | dataStmt
  | importStmt
  ;

exportStmt: EXPORT ID WHERE ;

importStmt: IMPORT ID ;

dataStmt: DATA ID '=' dataElem (',' dataElem)* ;

letStmt: ID '=' policyExpr ;

policyExpr
  : allowExpr
  | denyExpr
  | allowAllExceptExpr
  | denyAllExceptExpr
  ;

denyExpr
  : DENY attributeExpr
  | denyExceptExpr
  | literalExpr
  ;

denyExceptExpr: DENY attributeExpr EXCEPT '{' allowExpr+ '}';
denyAllExceptExpr: DENY EXCEPT '{' allowExpr+ '}';

allowExpr
  : ALLOW attributeExpr
  | allowExceptExpr
  | literalExpr
  ;

allowExceptExpr: ALLOW attributeExpr EXCEPT '{' denyExpr+ '}';
allowAllExceptExpr: ALLOW EXCEPT '{' denyExpr+ '}';

attributeExpr: '{' attribute+ '}' ;

literalExpr: ID ('::' ID)? ;

attribute
  : ID
  | ID ':' value (',' value)*
  ;

dataElem
  : ID
  | ID '(' value (',' value)* ')'
  ;

value: ID;

DENY: 'DENY' ;
EXCEPT: 'EXCEPT' ;
ALLOW: 'ALLOW' ;
IMPORT: 'import' ;
EXPORT: 'export' ;
WHERE: 'where' ;
DATA: 'data' ;
ID:    [a-zA-Z0-9]+ ;

SKIP_
  : ( NL | SPACES | COMMENT ) -> skip
  ;

fragment NL
  : ( '\r'? '\n' ) SPACES?
  ;

fragment SPACES
  : [ \t]+
  ;

fragment COMMENT
  : '//' ~[\r\n\f]*
  ;
A program's entry point is the program rule which defines either a library or an executable specification. These two keywords distinguish the programs that are executable from programs that just export policies to be used somewhere else. The former contains a main clause to start the evaluation, whereas the latter contains an export statement at the top level.
Examples
This section provides examples of Hapi specifications that illustrate how the language's syntactic constructs work in practice.
Basic Syntax
The program below is supposed to illustrate a simple policy that denies all accesses but allows for a specific group called Analyst to perform Reads in the Email and IP resources.
main =
  DENY
  EXCEPT {
    ALLOW {
      Actors: Analyst
      Resources: Email, IP
      Actions: Reads
    }
  };
Exporting and Importing
The next example demonstrates how we can export policies in one file and incorporate them in another.
// Main.hp

import Privacy;

main =
  DENY
  EXCEPT {
    ALLOW Privacy::analystActions
  };


// Privacy.hp

export Privacy where

analystActions =
  ALLOW {
      Actors: Analyst
      Resources
      Actions
    };
Each file defines a namespace. If a file doesn't export a module it is then declared (implicitly) as the Main module. On the other hand, if it is marked as export ... where statement, then it is an exportation of a module defining a namespace. File names must be the same as module names. Also, they must be in the same folder of the file that imports them. So, in the example above we have two files ("Main.hp" and "Privacy.hp") and they must be in the same folder (say "src" for instance).
Unicity and Totality
These are two essential properties we must enforce, in order to make sure our policies are consistent. Here we intend to give a general intuition on how the language’s syntax guarantees their satisfaction by construction.
- Totality: For each vector of sets of lattice elements T , and policy clause C, C allows T or C denies T.
- Unicity: For each vector of sets of lattice elements T , and policy clause C, C allows T and C denies T , are not both true.
The first one is guaranteed by the restriction that every main clause must have a "default" policy clause at the top.
// example 1
main =
  DENY
  EXCEPT {
    ...

// example 2
main =
  ALLOW
  EXCEPT {
    ...
This policy tells us that by default everything is denied (example 1) or allowed (example 2). And then we can specify further rules in the EXCEPT clause.
As for unicity, suppose we have two policies denyAnalyst and allowAnalyst. These policies alone do not really mean anything, we need to combine them in the program's main execution. So we define a main clause to be our entry point.
denyAnalyst = DENY {
                Actors: Analyst
                Resources
                Actions
              };

allowAnalyst = ALLOW {
                Actors: Analyst
                Resources
                Actions
              };

main= ALLOW
      EXCEPT {
        DENY denyAnalyst
      }
      EXCEPT {
        DENY denyAnalyst
        EXCEPT {
          ALLOW allowAnalyst
        }
      };
In this example (without loss of generality), it is a default ALLOW clause. According to the language semantics, all these conditions must be valid and all of its EXCEPT DENY clauses are valid as well (this will be better explained in the semantics section). There's only one way for the policy EXCEPT DENY denyAnalyst to be valid and that is by denying all access coming from Analyst. You might now wonder "What about the other one? Isn't it supposed to be valid as well?". In this case, it will be valid because of the semantics of the DENY clause. This structure of nested verification ensures unicity by construction.
As you may have noticed, these examples are a simple, yet an explanatory way to describe Hapi's grammar. In the next section, we dive into the semantics of the language and also highlight some implementation details.
Semantics
We now present the formal semantics of our language:
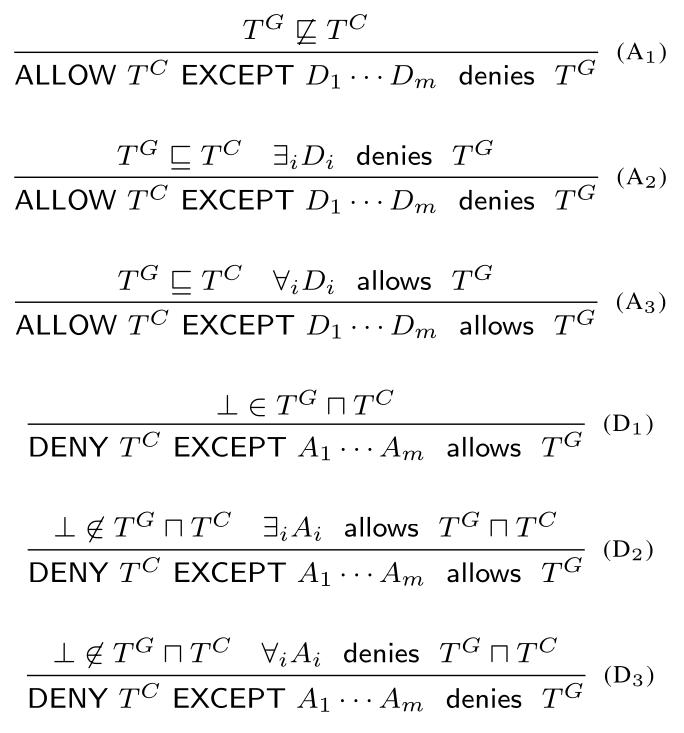
TC and TG are vectors of sets of lattice elements, representing respectively a clause during policy evaluation and the label of a node in the data dependency graph. As we've seen before, the data dependency graph is just a graph that shows the relation between the values of lattice elements (the examples should help make this concept clearer).
The partial order TG ⊑ TC is defined as:
- \(TG ⊑ TC = ∀ x . TG_x ⊑_x TC_x\)
- \(TG_x ⊑_x TC_x = ∀ v ∈ TG_x ∃ v' ∈ TC_x . v ≤_x v'\)
Where \(≤_x\) is the partial order associated with the lattice of attribute \(x\).
We also define an intersection operator \(⨅_x\):
- \(TG_x ⨅_x TC_x = { ∀ v ∈ TG_x v ∧_x v' | v' ∈ TC_x }\)
Where \(∧_x\) is the meet operator for the attribute \(x\).
Last we define the notation:
- \(⊥ ∈ TG ⨅ TC = ∃ x . ⊥ ∈ TG_x ⨅_x TC_x\)
Basically we want to check if there's an attribute \(x\) such that \(v ∧_x v' = ⊥\) for every \(v ∈ TG_x\) and \(v' ∈ TC_x\).
This whole thing might sound too abstract, so let’s look at some examples to clarify.
Examples
This is a walk-through example over the following policy:
main =
  DENY
  EXCEPT {
    ALLOW {
      Actors: Analyst
      Resources: EMAIL
      Actions: Reads
    } EXCEPT {
      DENY {
        Actors: Bob
        Resources: EMAIL
        Actions: Reads
      }
    }
  };
It will be represented as a triple (operation, attributes, except_list):
clauses = [
   ("DENY", {'Actors': {"Top"}, 'Resources': {"Top"}, 'Actions': {"Top"}}, [
       ("ALLOW", {'Actors': {"Analyst"}, 'Resources': {"ip"}, "Actions": {"reads"}}, [
           ("DENY", {'Actors': {"Bob"}, 'Resources': {"ip"}, "Actions": {"reads"}}, [])
       ])
   ])
]
And the following data dependency graph with only one node:
[{Actors: {“Bob”}, Actions: {“Reads”}, Resources: {“EMAIL”}}]
That means, we want to answer the following query: can Bob perform Reads operation in the EMAIL resource?
Well, the first clause is an empty DENY (denies everything), so we must look if at least one of its EXCEPT clauses allow our node.
For the EXCEPT ALLOW clause, Bob ≤ Analyst, EMAIL ≤ EMAIL and Reads ≤ Reads (reference lattices), so OK! Then it is allowed right? No, we have to check if all of its deny clauses are valid as well.
For the last EXCEPT DENY clause, Bob ∧ Bob = Bob, EMAIL ∧ EMAIL = EMAIL, Reads ∧ Reads = Reads, therefore \(⊥ ∈ TG ⨅ TC\) is false and our policy result denies our node.
In other words, Bob can’t read emails!
Let’s try another node now, what about this one:
[{Actors: {“Alice”}, Actions: {“Reads”}, Resources: {“EMAIL”}}]
Which is equivalent to asking: can “Alice” perform the “Reads” operation on the “EMAIL” resource?
For the first DENY it’ll be the same.
In the EXCEPT ALLOW clause, Alice ≤ Analyst, EMAIL ≤ EMAIL and Reads ≤ Reads, OK! So, let’s check our DENY clause.
EXCEPT DENY, Alice ∧ Bob = ⊥ … wait a moment, we already have it! I doesn’t really matter the other attributes because just by checking this one we know that \(⊥ ∈ TG ⨅ TC\). So our last clause is also valid in our node.
That means that Alice can read emails!
Examples
In this section we aim to present some examples of policies defined in natural language and how they can be translated into Hapi.
Read-only access
"Bob can read all resources, Alice can read and update emails, but only read credit card numbers."
main =
  DENY
  EXCEPT {
    ALLOW {
      Actor: Bob
      Resources
      Actions: Reads
    }
    ALLOW {
      Actor: Alice
      Resources: EMAIL, CCN
      Actions: Reads
    }
    ALLOW {
      Actor: Alice
      Resources: EMAIL
      Actions: Updates
    }
  };
Add a default rule
"Everyone can read emails. Bob can read and delete all data but only updates credit card numbers. Alice can perform all actions in emails"
main =
  DENY
  EXCEPT {
    ALLOW {
      Actor: Bob
      Resources
      Actions: Reads, Deletes
    }
    ALLOW {
      Actor: Bob
      Resources: CCN
      Actions: Updates
    }
    ALLOW {
      Actor
      Resources: EMAIL
      Actions: Reads
    }
    ALLOW {
      Actor: Alice
      Resources: EMAIL
      Actions
    }
  };
Apply the same rules to a group of users
"Bob, Alex and Jeff can read all resources, but Alex can't read emails."
alexCantReadEmails =
  DENY {
        Actors: Alex
        Resources: EMAIL
        Actions: Reads
      };

main =
  DENY
  EXCEPT {
    ALLOW {
      Actor: Bob, Alex, Jeff
      Resources
      Actions: Reads
    }
    EXCEPT {
      DENY alexCantReadEmails
    }
  };
Apply rule to a service/group identified by its name
"Operating Cost Predictor service can read all the data."
main =
  DENY
  EXCEPT {
    ALLOW {
      Actor: OperatingCostPredictor
      Resources
      Actions: Reads
    }
  };
Here we're applying rules to a group of values in our lattice. In this case, the service OperatingCostPredictor may be composed of members such as Alice, Bob and Jeff. Then the rules applied to OperatingCostPredictor will also be applied to the three of them.
Combining rules to services/groups with intersections
"Operating Cost Predictor service can read all the data but Intern can't read sensitive ones."
internDontAccessSensitiveData =
  DENY {
        Actors: Intern
        Resources: Sensitive
        Actions
      };

main =
  DENY
  EXCEPT {
    ALLOW {
      Actor: OperatingCostPredictor
      Resources
      Actions: Reads
    }
    EXCEPT {
      DENY internDontAccessSensitiveData
    }
  };
In this context, let's say that the group Intern is made of Bob and Jeff. And the OperatingCostPredictor service contains Alice and Jeff. Therefore, Alice will be able to read all data, but Jeff, because he is an intern, won't be able to read sensitive data.
Tooling
In this section we’ll cover some of the tools that come with the Hapi program and make it easier to use.
They are:
- The Translator;
- The Visualizer;
The Translator translates Hapi files to YAML. In practice, this gives the language almost universal versatility, as the great majority of Access Policy programs in use today are structured by YAML.
The Visualizer is the tool that helps the user to deal with their Hapi policies, providing a helpful report, when they are inserted in a specific field in the WEB application.
All information and instructions necessary, as well as some practical examples, are given in the coming subsections.
Translator
Translator is the tool that converts files written in the language Hapi (.hp) to YAML(.yaml) language.
It is an essential tool in our project, as it is thanks to this ability to convert policy files, from .hp for .yaml, that Hapi can be easily integrated into existing Access Policy systems. Bear in mind that many of them already have YAML as a standard.
The conversion is done through a code written in Kotlin that works as follows: The code receives a file written in Hapi and obtains a Datamap from it, containing all sets of Actions, Actors and Resources which are accepted/allowed by the policy. It then goes through that Datamap, rewriting the policy in a new .yaml file, based on these sets. This Datamap is obtained through a pre-existing function in Kotlin that we have incorporated in Hapi; which is the Visitor function. The source code of this translator can be seen in the file hapi\src\main\kotlin\tasks\YAML.kt.
The next subsections briefly present the operation of the tool in practice, with examples of use cases, and aim to teach the user how to make good use of this feature in their work.
Tutorial
There are two ways to use Translator:
- Through Visualizer, our Hapi web application that brings together all the resources of the project in one place.
- Through the Command Terminal.
Visualizer
For a lighter experience, we recommend using the translator through our WEB Application. Visualizer (Fig.1), which is another tool that accompanies the Hapi program. That way it will be very simple to use Translator to convert the policies written in .hp to .yaml:
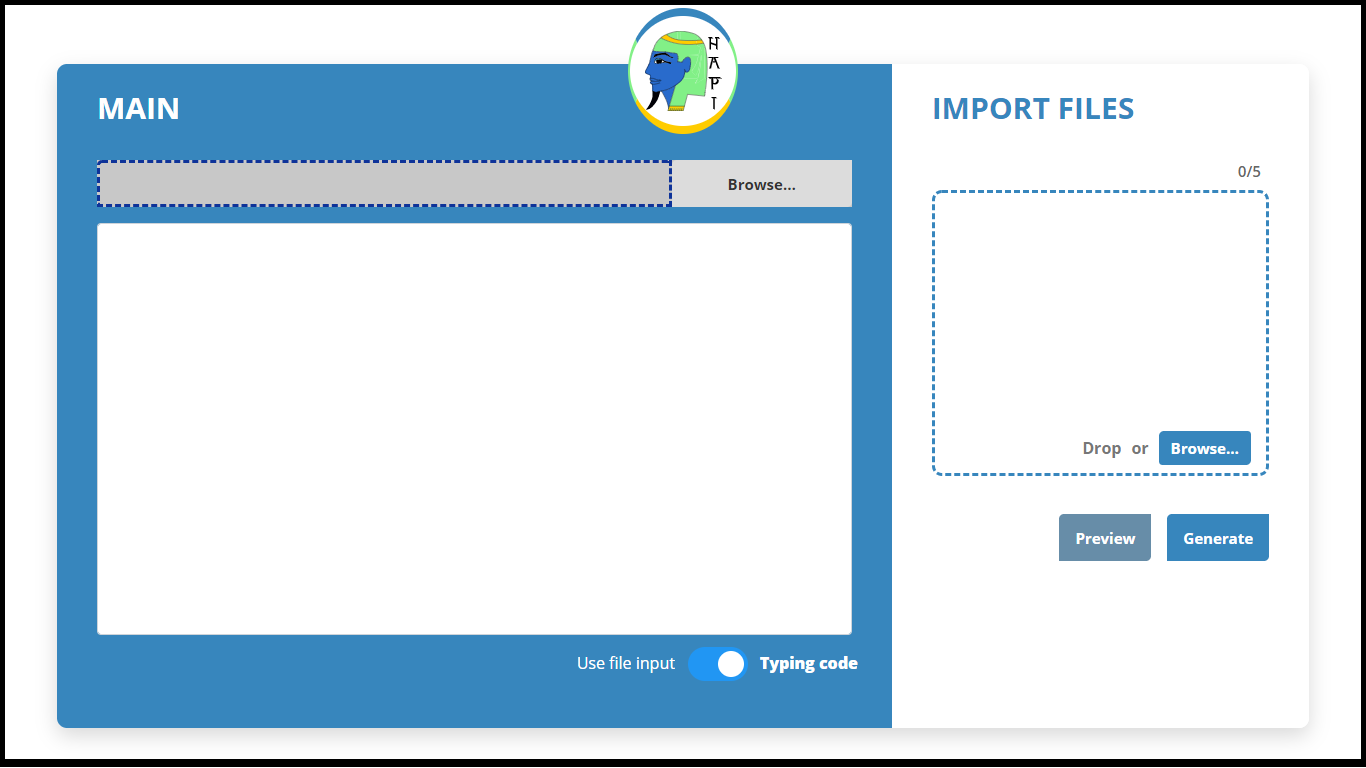
After inserting the Policy created in the designated field, the user only needs to run the application, and it will return the translated YAML file, which may then be downloaded.
NT.:See [next section](http://cuda.dcc.ufmg.br/hapidoc/tooling/visualizer/index.html) for the Visualizer installation walkthrough
Command Terminal
In this case, it will be necessary to have the Gradle component properly installed on your machine. In the Hapi root folder (../hapi/), enter the command:
gradle run --args=path/of/your/file.hpunder the desired policy file. A .yaml file will be generated as output, with the same name and in the same folder as the input .hp file.
Note: Gradle already comes with the Hapi installation package.
We will present some examples using both methods, in the following subsection.
Examples
To demonstrate the execution of the translator we will use policies and images, with step-by-step instructions.
Visualizer
Suppose we have only the users Bob and Alice, belonging to Looker. We want to give all files access to both; Bob, however, should not access EMAIL. This policy can be written in Hapi, having the following format:
data Actors =
  Looker(Analyst),
  Analyst(Alice, Bob),
  Alice, Bob;

data Actions = Reads, Deletes, Updates;

data Resources =
  Claims(Finance),
  Finance(Customers, Companies),
  Customers(CCN), Companies(EMAIL, SSN),
  CCN, EMAIL, SSN;

main =
  DENY
  EXCEPT {
    ALLOW {
      Actors: Analyst
      Resources
      Actions
    }
    EXCEPT {
      DENY {
        Actors: Bob
        Resources: EMAIL
        Actions: Deletes, Updates, Reads
      }
    }
  };
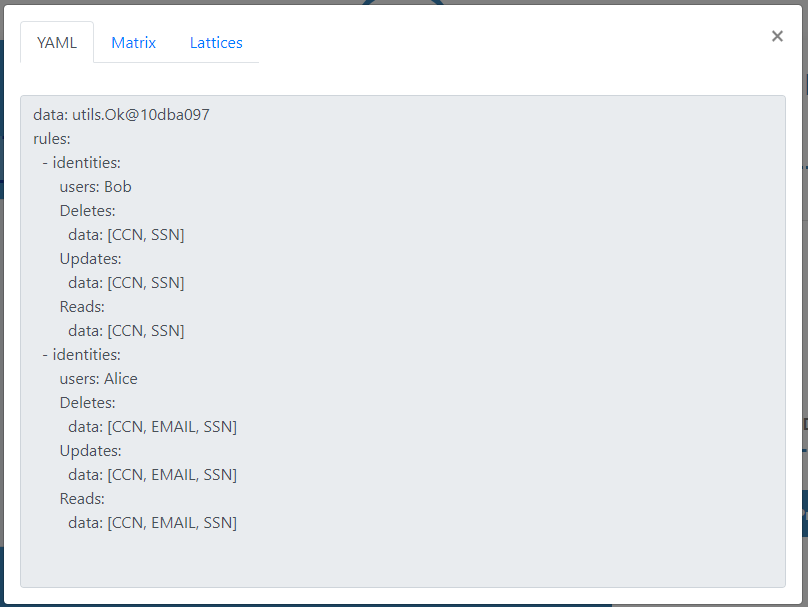
Try it yourself! Copy this policy to Visualizer, inside the field Input - Hapi. Then, press the button Generate; the application will execute the translator on it, and the result below should appear in Output - YAML:
data: [SSN, EMAIL, CCN]
rules:
  - identities:
      users: Bob
      Updates:
        data: [SSN, CCN]
      Deletes:
        data: [SSN, CCN]
      Reads:
        data: [SSN, CCN]
  - identities:
      users: Alice
      Updates:
        data: [SSN, EMAIL, CCN]
      Deletes:
        data: [SSN, EMAIL, CCN]
      Reads:
        data: [SSN, EMAIL, CCN]
Now just download your fresh YAML policy, and use it wherever you wish.
Command Terminal
Consider the same policy as above, the only difference now will be the means by which the translator is executed. In the root directory ..\hapi\, to translate the file ..\hapi\src\test\Example1.hp, the user should run the command (Fig. 1):
gradle run --args=src\test\Exemplo1.hpThat will generate the resulting YAML file Example1.yaml (Fig. 2).


Visualizer
Visualizer is the tool that helps the user when creating policies in Hapi. It is responsive, intuitive, and provides the user from any device with access to the WEB a simple and always-ready graphical interface.
This tool aggregates all the functionalities available in the Hapi project so far, namely: Translator, Matrix Printer and Lattices Print.
In addition, the application also has Error Notification, which appears in cases where the program is written outside the syntax defined for the Hapi Language. The error message indicates the line and the probable cause of the error presented, thus facilitating the user's correction through the Visualizer itself.
This tool is freely available online through the link: Visualizer. More information on its practical usage will be given in sequence.
Tutorial
Installation
Visualizer can be installed with or without the aid of Docker, which is a tool that creates local "containers", with all the necessary dependencies to run a program, without installing these dependencies directly on the user's machine.
To perform the installation with the aid of Docker, run the command:
docker build -t hapi-visualizer .
That will create the container for Visualizer. Afterwards, it is necessary to run the command:
docker run -p < local port >:8080 -d --rm hapi-visualizer
Replacing the < local port > by the port number where you want to run the application.
Next, just enter the chosen port address (e.g. "localhost:") on your prefered browser,
and you should be able to start using the tool.
For installation without Docker, run the command:
/bin/bash build.sh run --from-scratch
And all the dependencies necessary to run the Visualizer will be installed on the machine.
After this process, you also need to run these two commands:
npm -i and node server.js.
The Visualizer will be running on port 8080 of the machine, which can be accessed through
the link http://localhost:8080/.
Please note that in addition to the options described above, our application is already available online, and can be accessed through the Link: Visualizer.
Operation
Visualizer was made to be a practical and intuitive tool, aiming to facilitate the creation of Policies made in Hapi.
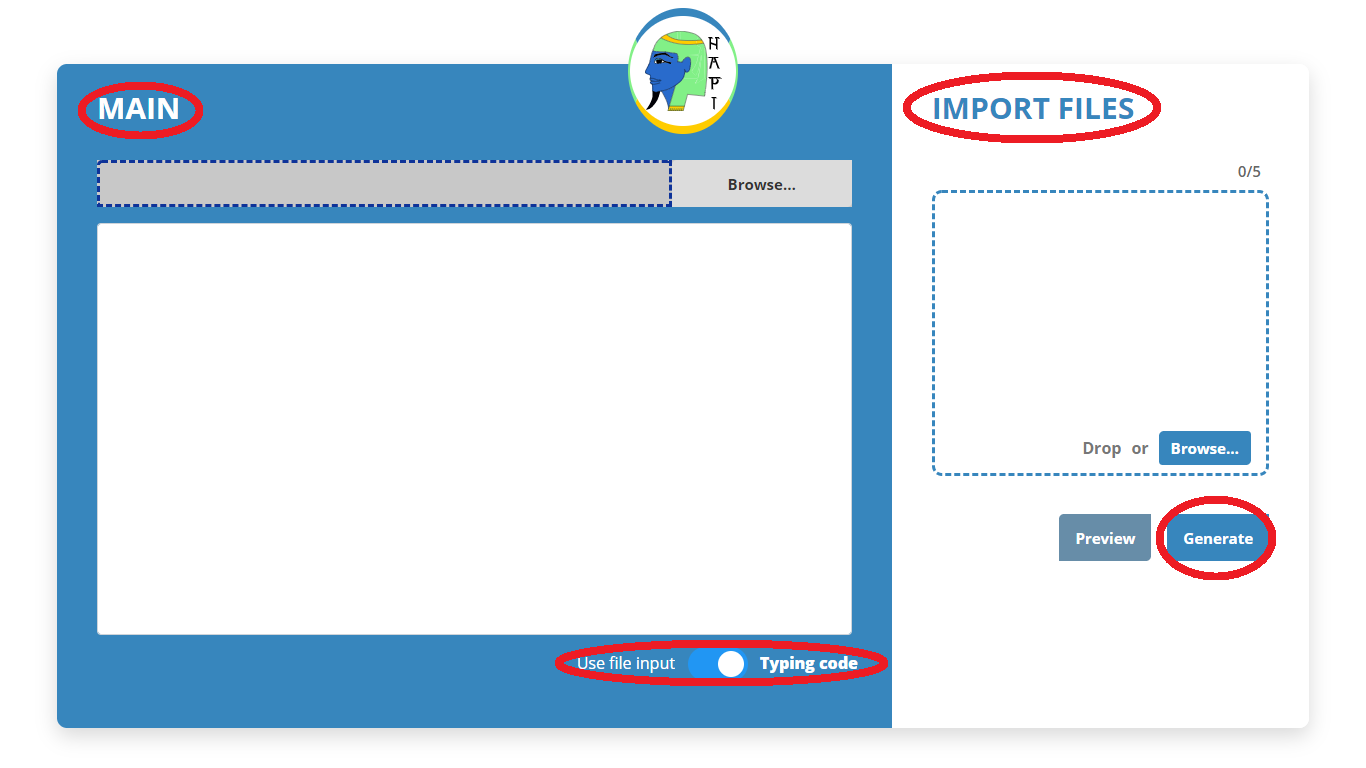
The primary interface of the application presents two fields for inserting policies in Hapi:
- MAIN - It is the field where the user will place the main body of the policy:
main = {...}. The user can choose to manually write this body, or import his main file directly from his machine, through the filter Use input file. - IMPORT FILES - It is the field where the user can import all the Hapi files that make up the body of his policy. These include lattice definition files, variable declarations, among others; with a limit of 5 imported files.
After allocating his policy in the appropriate fields, the user must select the button Generate. If the syntax of the files and the entire policy is correct, the tool will display a modal, containing the YAML file, the Data Matrix and the Lattices graphics, which can then be downloaded as needed. If the policy syntax is incorrect, the Visualizer will display an error message, indicating which error occurred, and the line it thinks is likely to have caused it.
Examples
There are several ways to create Hapi policies using Visualizer. As an example, the following demonstrate how to use Visualizer to create the same policy by three different means.
The policy in question declares the types of data: Actors, Actions and Resources,
and determines that the members of the Actors Actors group Analyst have access to
Resources CCN, EMAIL, SSN, performing the Actions Deletes, Updates, Reads.
However, Analyst Bob cannot perform any Action under Resource EMAIL.
This policy can be defined in two sets: The Data declaration:
data Actors =
  Looker(Analyst),
  Analyst(Alice, Bob),
  Intern(Bob, Jeff),
  Alice, Bob, Jeff;

data Actions = Reads, Deletes, Updates;

data Resources =
  Claims(Finance),
  Finance(Customers, Companies),
  Customers(CCN), Companies(EMAIL, SSN),
  CCN, EMAIL, SSN;
The Main:
main =
  DENY
  EXCEPT {
    ALLOW {
      Actors: Analyst
      Resources: CCN, EMAIL, SSN
      Actions: Deletes, Updates, Reads
    }
    EXCEPT {
      DENY {
        Actors: Bob
        Resources: EMAIL
        Actions: Deletes, Updates, Reads
      }
    }
  };
Ways:
- 1 - The User can place all the data in a single file, simply importing it from MAIN's Browse, or transcripting the entire file into the designated field.
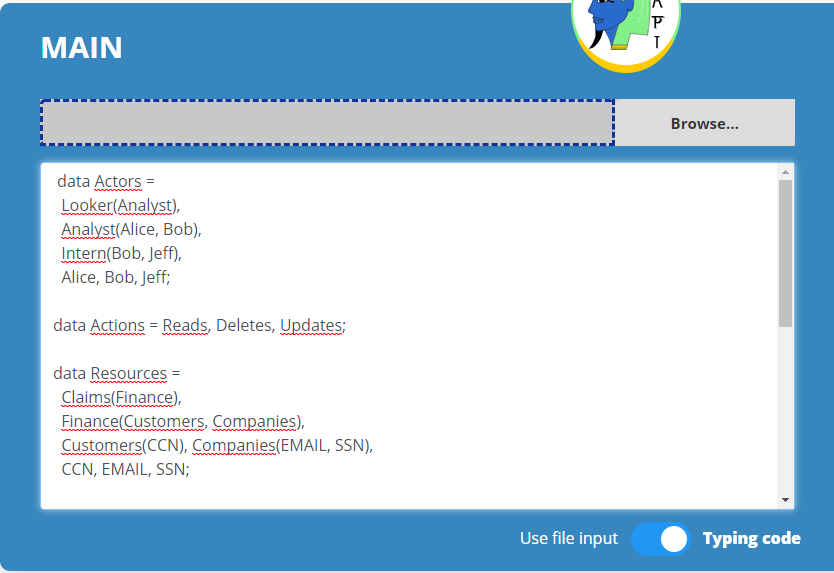
- 2 - The policy can be divided into two files, one with the data declaration and the other with the main. Thus, the user can create their policies beforehand and only later come to insert them in Visualizer.

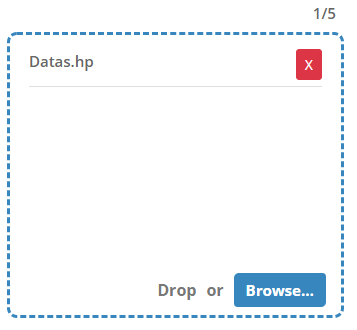
- 3 - The User can define the data declaration file in advance, importing it into Visualizer, and create his main through the tool. This way, he will be able to create not only this specific "Bob policy", but also several others, without ever needing to change his imported data files.
In all these cases, the generated modal will be the same, with the YAML file, the Matrix and the identical Lattices.
We hope to make Visualizer a complete and versatile tool, having a simple interface while integrating all Hapi functionalities. By having several ways to create your policies, we hope that the user will find one that best suits their needs and feels motivated to use the tool through the link: Visualizer.
Contributors
Alexander Thomas Mol Holmquist - alexthomasmol@gmail.com
Celso Junio Simões de Oliveira Santos - celso.simoes@dcc.ufmg.br
Fernando Magno Quintão - fernando@dcc.ufmg.br
Flavio Lucio Correa - flavio.correa@dcc.ufmg.br
Haniel Barbosa Rodrigues - hbarbosa@dcc.ufmg.br
João Saffran - <>@dcc.ufmg.br
Vinicius Julião - viniciusjuliao@dcc.ufmg.br